
Necessary cookies help make a website usable by enabling basic functions like page navigation and access to secure areas of the website. The website cannot function properly without these cookies.
How to Build an AI Chatbot: Step-by-Step Guide
I've said it many times and I will say it again: AI chatbots have been game changers in customer service in these past years. This is why more and more shops are turning to it. In this article, I will explain how to build your own chatbot using Amio as an example. Hopefully, this will make your life a bit easier.
What to Know Before Developing an AI Chatbot
Before we dive into choosing the right solution, let’s get one thing straight: AI is the default. You’ll often hear terms like “generative chatbots” or “LLMs,” but what most businesses really need is a chatbot that understands customers and helps them solve problems, without predefining every single sentence it might say.
Let’s quickly break down the types of chatbots so we’re on the same page:
Modern AI Chatbots: These are powered by large language models (LLMs), like those behind ChatGPT. They are open-domain chatbots that can understand user intent, maintain context, and generate helpful, dynamic responses. With platforms like Amio, this power is combined with business-specific logic, so your chatbot is both smart and on-brand.
Legacy Bots - Rule-Based chatbots or “Predefined Answer” Bots: These were the standards just a few years ago. They rely on if-then logic trees or buttons.
Example: If a customer says, “Where is my order?” → Show Order Tracking page.
These bots are reliable but very rigid. They break easily when customers don’t follow the expected path. Many tools still offer this type of chatbot (like Chatfuel or Landbot), but they’re increasingly limited in complex scenarios.
These systems can be integrated into chat widgets on websites, messaging apps, or CRM platforms to improve user experience and reduce human workload. Businesses can also export conversation histories (chat export) for review or retraining purposes.
However, chatbots must be tested rigorously, continuously improved using user feedback, and monitored to avoid issues such as data leaks or incorrect responses. A well-designed chatbot evolves over time, learning from interactions and improving accuracy with new annotated data.
Step-by-Step Guide to Developing a Chatbot
Designing an AI-powered chatbot goes beyond coding; it’s about crafting intelligent conversations that meet your business goals while delivering a seamless user experience. Here’s a modern, realistic approach to building one.
1. Start with a Clear Use Case
Before writing a single line of code or choosing a platform, define your chatbot’s core purpose. Are you streamlining customer support, generating leads, or guiding product recommendations?
A focused goal helps you avoid bloat and makes it easier to measure success. You’ll also know what kind of training data (like chat logs or customer inquiries) you’ll need later.
2. Pick the Right Tools and Infrastructure
Once the goal is clear, decide whether you want a custom-coded solution or a platform-based one.
For Shopify and e-commerce businesses, tools like Amio offer native chatbot solutions that integrate directly into your store and messaging channels like WhatsApp conversations or web chat widgets. Amio simplifies the setup and provides strong automation capabilities, making it easier to handle customer support and post-purchase flows.
If you're building more complex AI chatbots or need open-ended conversation capabilities, consider using the Chatgpt API, especially when working with custom workflows or enterprise data.
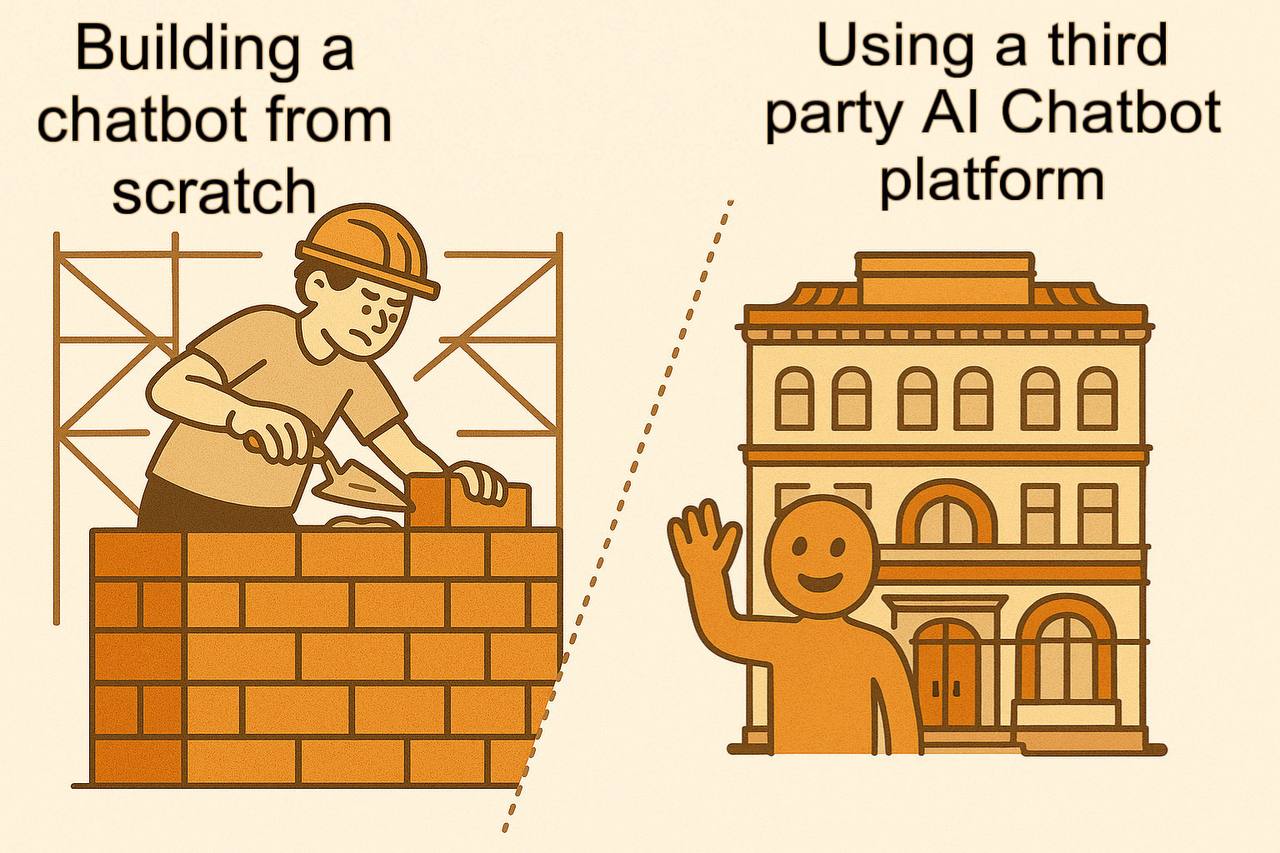
Amio provides a flexible infrastructure designed for scale. Even large companies like Footshop use AI chatbot platforms as a middle layer, rather than trying to build everything from scratch which is probably not worth it...
💡 Tip: If you’re working with enterprise data, ensure your system complies with your privacy policy and data handling standards from the start.
3. Map Out the Conversation
Great bots don’t wing it; they follow a clear structure for the best customer experience.
Build a conversation flowchart: How does the chatbot greet users? How does it respond to common questions or unexpected inputs? Include fallback messages and escalation paths to human agents when needed.
4. Prepare and Label Your Training Data
High-quality, well-structured training data is what makes your chatbot smart.
Amio uses a mix of AI answers and pre-defined answers in case you want to connect to your internal system.
For example, you can use sources like:
- Internal chat logs or customer support transcripts
- Frequently Asked Questions (FAQs)
- User-submitted forms/feedback
- Labeled intent/response pairs from past customer interactions
For the pre-defined answers, you should be searching for a solution that has a template for this step for the best results. For example, in Amio we cover more than 20 most frequently asked questions for e-commerce (where is my order? Do you ship to Europe? and so on).
5. Train, Test, and Refine the Bot
With your data in place, train your bot to recognize different user intents and respond accordingly.
When using Amio, you can deploy the chatbot in a virtual environment and test common scenarios.
Can it connect to a live agent? Does it respond to product inquiries? Can it handle after-sale support? And so on.
Once the bot is functional, test it across scenarios. Use metrics like:
- Response accuracy
- Completion rates
- Sentiment trends
- User feedback (what they liked, what confused them)
6. Launch, Monitor, and Evolve
After testing, roll out your bot gradually. Start on a limited channel - like your website or Slack - before expanding.
But launching isn’t the end: AI chatbots thrive on practice.
Monitor performance, retrain with fresh data, and continuously tweak flows based on real-world conversations. Bots get smarter with time, as long as you keep feeding them feedback and new edge cases.
How to Build a Chatbot with Amio
Amio is a GPT-powered AI chatbot designed for e-commerce (Shopify, WooCommerce, etc.). It can automate over 90% of customer support queries by importing your store’s data and answering questions about products, orders, shipping, and more. And escalate the chat to a human agent if needed.
This guide walks through each step – from creating your Amio account to integrating with your store, building intent-based flows, testing, and launching – so you can set up a ready-to-go e-commerce chatbot even without prior experience.
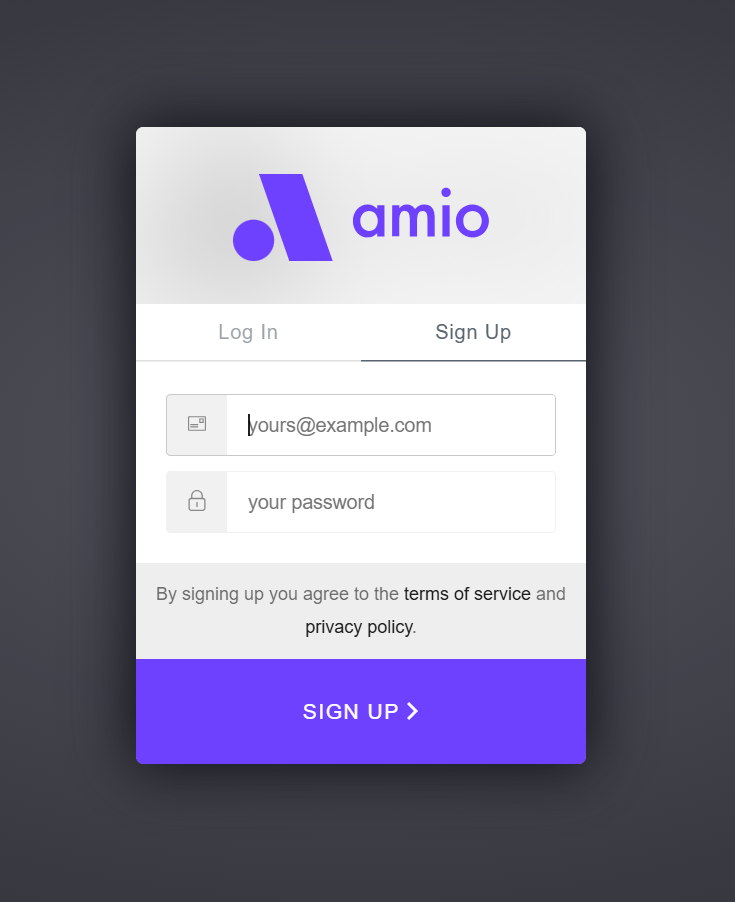
Step 1. Sign Up & Set Up Your Amio Account
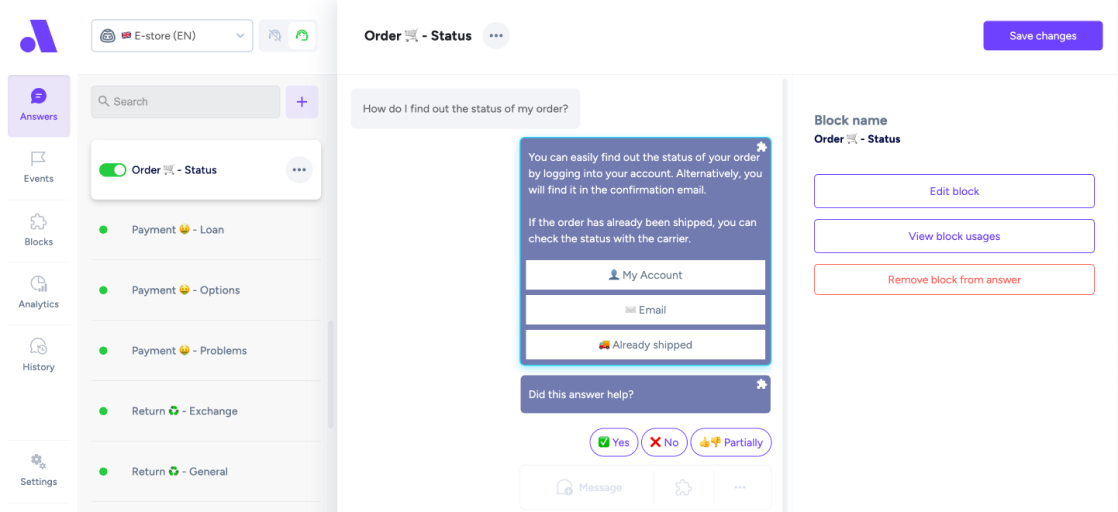
- Create an Amio account: Go to amio.io and sign up (there’s a free trial). You’ll start with an e-commerce chatbot template that already includes common FAQs. After you finish onboarding, Amio provides this template bot preloaded with typical questions (order status, returns, etc.), which you can activate or customize.
- Configure basic settings: In the Amio dashboard, set your store name, language, and tone of voice. Edit each predefined answer to match your brand’s style (tone, voice, emojis, etc.). Keep answers short and clear, and use formatting (buttons, bullet lists) if needed for long info.
Step 2. Connect to Your Store (E-commerce platforms or your own website)
- Link your e-commerce platform: In Amio’s settings, go to Integrations or Channels. Add a new integration for Shopify, WooCommerce or more.
learn in details how to connect your Shopify store to Amio
- Embed Amio Web Chat to your webpage directly: To embed Amio Web Chat to your webpage, just include a script (see code below) and call the init() function.
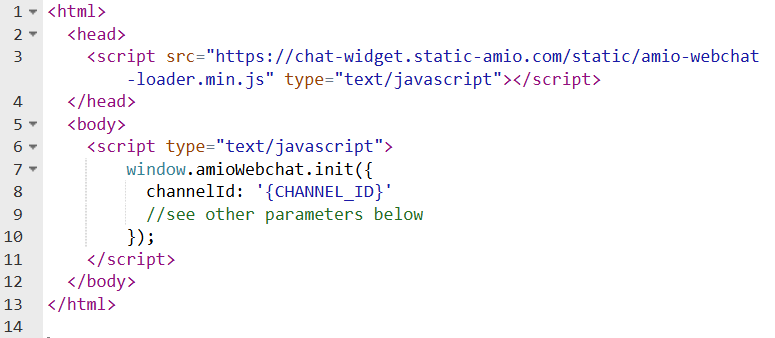
Don't forget to replace {CHANNEL_ID} with the ID of your Amio Chat channel.
Check all available customization here.
- Embed Amio Web Chat to your webpage with GTM:
- Go to your Google Tag Manager container and create a new tag.
- Click on "Discover more tag types in the Community Template Gallery" and search for Amio.
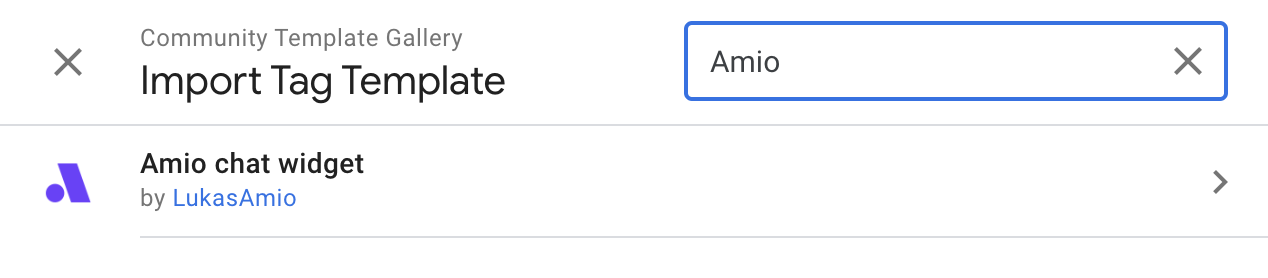
- And add it to your workspace.
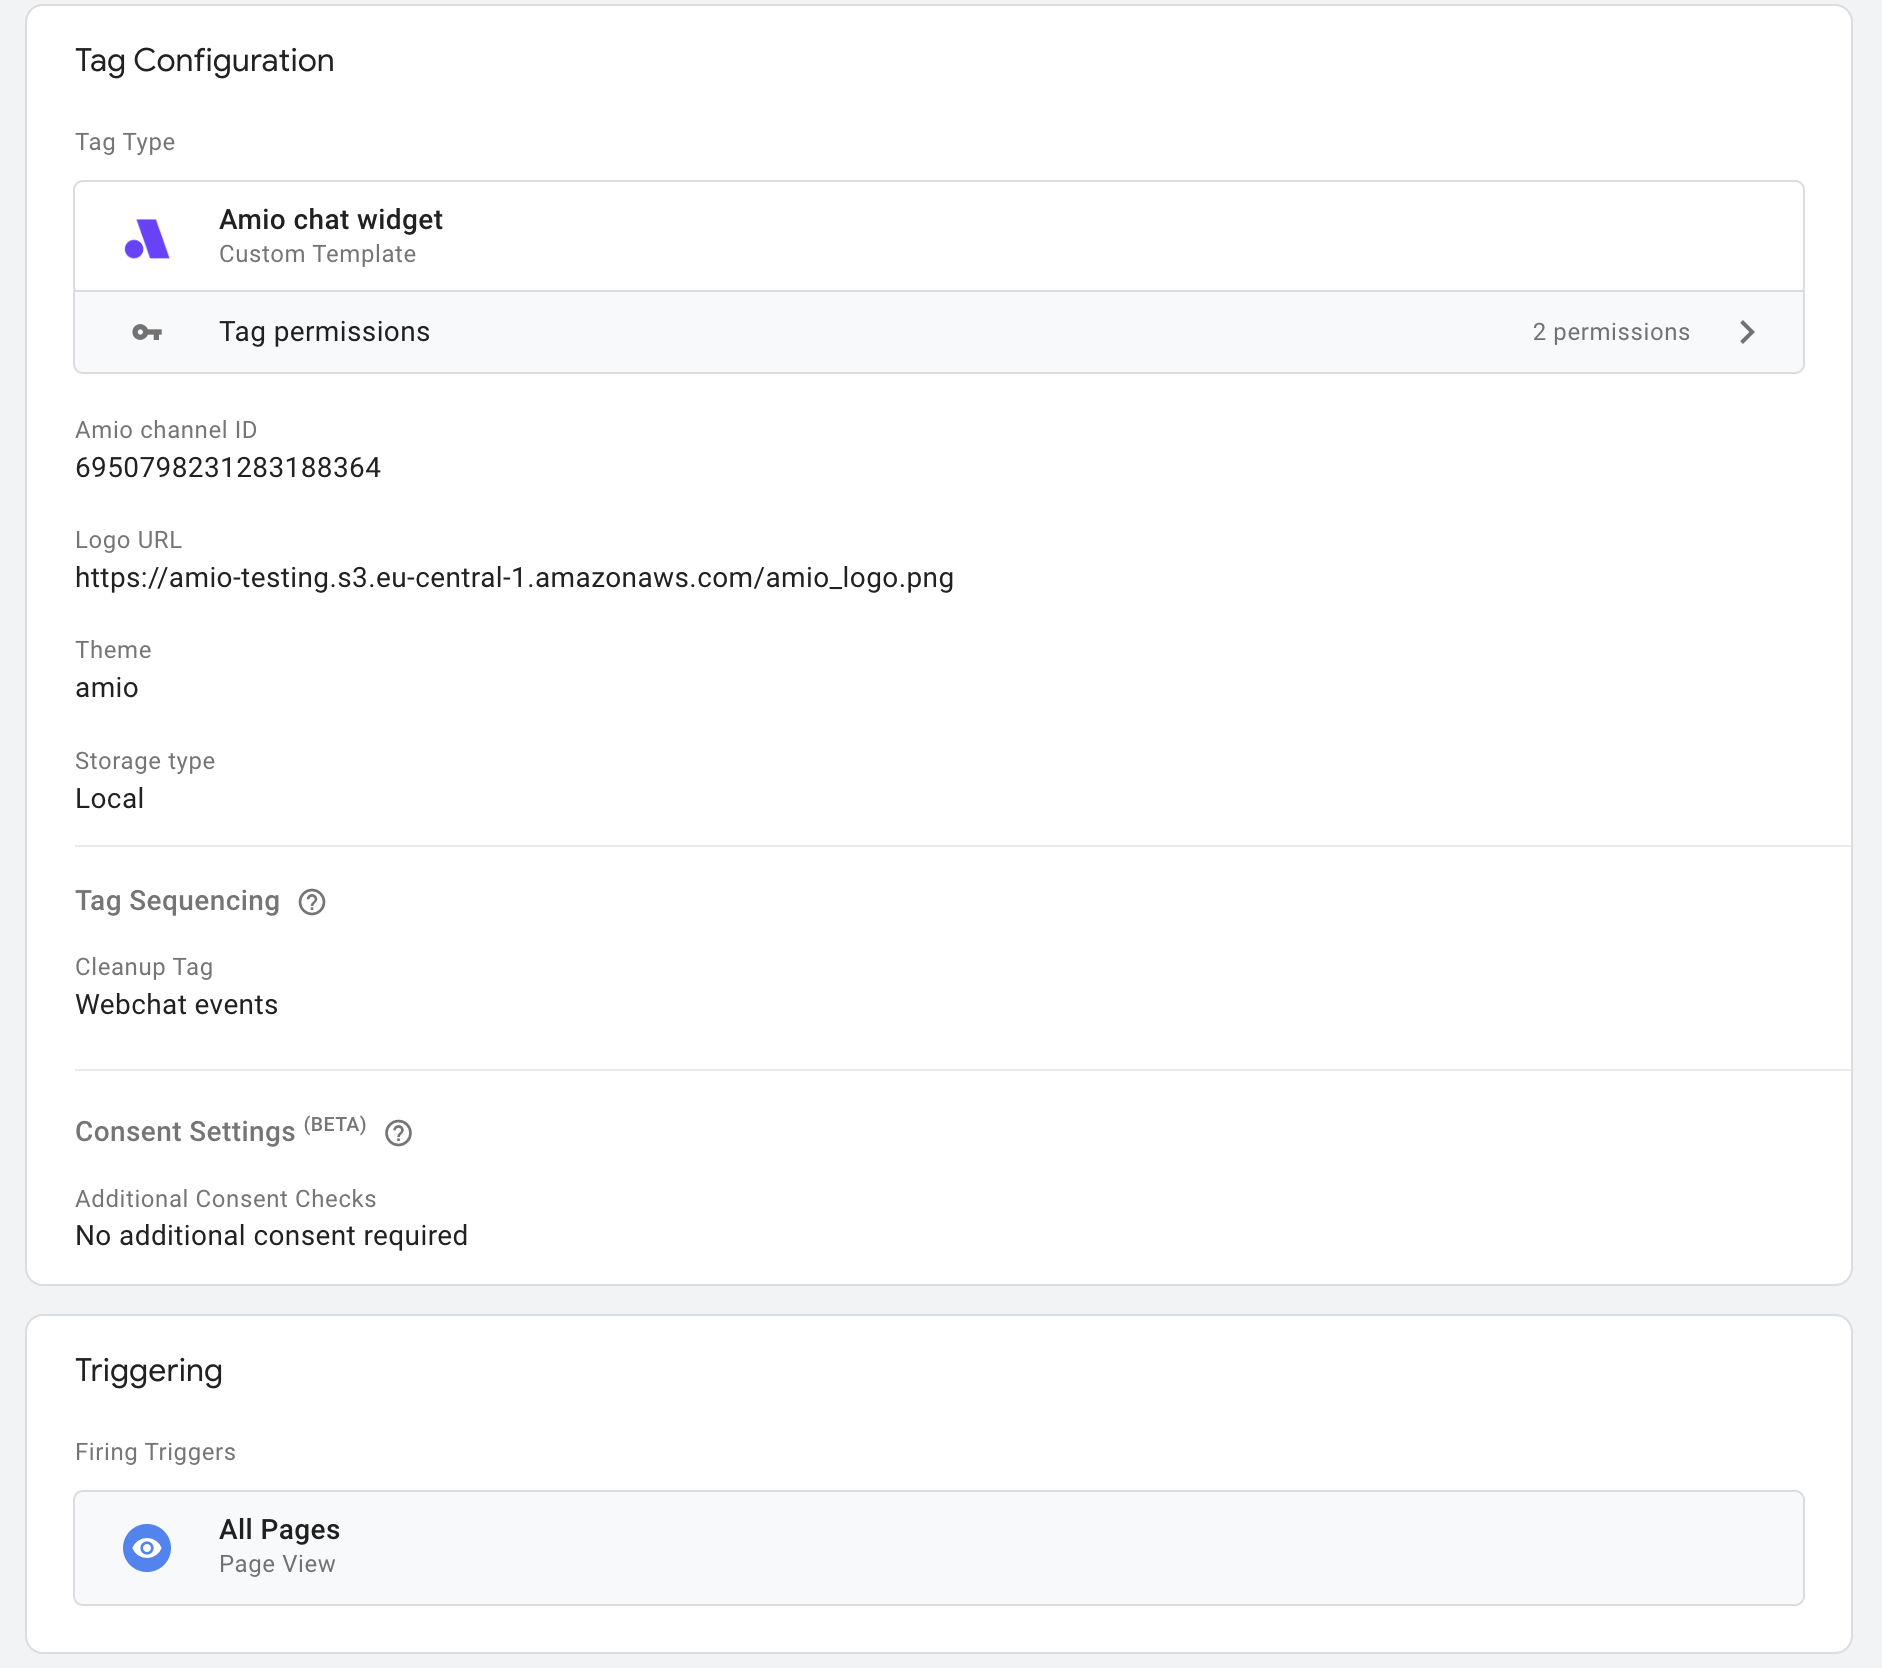
- Now you are prompted to input additional parameters - these should be given to you by your account manager.
Step 3. Import Product & Knowledge Data
Product feed: To give the AI chatbot accurate product info, upload a current product feed (XML or CSV) to Amio. You can export this from Shopify or WooCommerce. Include key fields: name, description, price, availability, images, and links. Then go to Amio’s Knowledge Base (or AI Knowledge Base) and either upload the file or paste its URL. The chatbot will then answer questions like “Show me blue running shoes under $100” using real data from your store.
Static content (FAQs, policies): Add important pages like FAQs, shipping info, or return policy by saving them as PDFs or text files. Upload these to the Knowledge Base so the AI can answer common questions like “Do you ship to Canada?” or “What’s your return policy?”
Step 4. Build Conversation Flows & Intents
Amio is an AI chatbot that uses the ChatGPT API to answer questions. But you can use Amio’s no-code conversation builder to define responses for those repetitive questions.
- Start with common questions: like “Order status,” “Return policy,” or “Product help.” You can set a fixed reply or let AI respond using your imported data.
Keep things simple at first: one question → one clear answer, with optional buttons.
Step 5. Set Up Live Agent Handover
If the bot can’t help or a customer wants a human, Amio lets you forward chats easily.
- Connect your helpdesk: in Amio’s settings (e.g. Shopify Inbox, Zendesk, Gorgias). You can also set a fallback email to receive escalated questions.
- Use manual triggers for handover: Add a “Talk to a human” step in a flow. Even if no live agents are available, the bot can forward the conversation and let the user know someone will follow up by email.
Step 6. Customize the Chat Widget and Deploy
You can customize appearance and behavior via optional parameters. Common options include:
- Channel ID - ID of channel in Amio
- Logo URL - link to a logo displayed in the header of the chat
- Theme - the visual design of your chat
- Storage Type - Local or Session - if you want to hold the history of chat across multiple sessions, use Local. The Session deletes the history each time you visit the website.
- Wide widget - determines whether small or big launcher is used.
Keep in mind that this process will be slightly different on different platforms (e.g. WordPress, Wix, Webflow) but the principle is the same: insert the Amio script snippet into a global header/footer location or use a code-injection plugin.
Step 7. Test Your Chatbot
Use the Amio chat preview. Amio provides a web-chat testing interface (with your unique channel ID) that you can access after logging in and use to test the bot.
Step 8. Launch and Monitor
- Go live and monitor performance: Using Amio's AI-driven data analysis, you can track metrics like conversation count, deflection rate, and satisfaction. Regularly review logs to see unanswered questions or confusing interactions. Update your flows and predefined answers based on real customer queries.
- Continuous improvement: Keep refining the AI chatbot. Update the knowledge base when your product line or policies change. Use Amio’s analytics to identify trending questions. Over time, this feedback loop will make the chatbot more accurate and helpful.
Key Factors to Consider While Creating an AI Chatbot
As you build, consider:
User Experience Comes First
Design for clarity, speed, and tone. Whether your bot is answering questions or guiding a transaction, the customer experience should feel smooth and intuitive.
Security and Data Privacy
From chat export files to stored user queries, all data must be encrypted and access-controlled. Always disclose how you use customer data and follow applicable privacy laws.
Scalability
Your bot might start with 100 support requests, but what about 10,000? Use AI-infused solutions to future-proof your tech.
Ongoing Improvement
Gather user feedback, study failed conversations, and tweak the AI chatbot regularly. Updating your training data based on actual interactions ensures your bot improves over time.
Integration
Whether it’s plugging into a CRM, syncing with your knowledge base, or appearing on a chat widget, make sure your bot connects with your digital ecosystem.
Conclusion
Whether you're running a Shopify store, a WooCommerce setup, or a fully custom website, adding an AI-powered chatbot can dramatically improve your customer support and overall user experience. By embedding Amio’s chat widget across your entire site, you ensure that visitors always have instant access to answers, guidance, or product info, right when they need it.
You can create conversation flows tailored to your business, connect them directly with your e-commerce platform, and manage everything from one simple dashboard. Plus, with the ability to train your bot using real chat logs, customer inquiries, and user feedback, your chatbot becomes smarter over time, handling more questions, reducing your workload, and boosting customer satisfaction.
It can seem like an overwhelming journey, but it is worth it, and we are here to help you so feel free to connect!
Table of Contents
Start building AI chatbots with Amio.
Book a 30-minute session where we will find out how AI bot can help you decrease call center costs, increase online conversion, and improve customer experience.
Book a demoWhat is Amio?
We understand your business on
Book a 30-min consultation session where we will discuss your support cost optimization potential, experience improvements, including our online conversion increase techniques
Request a demo